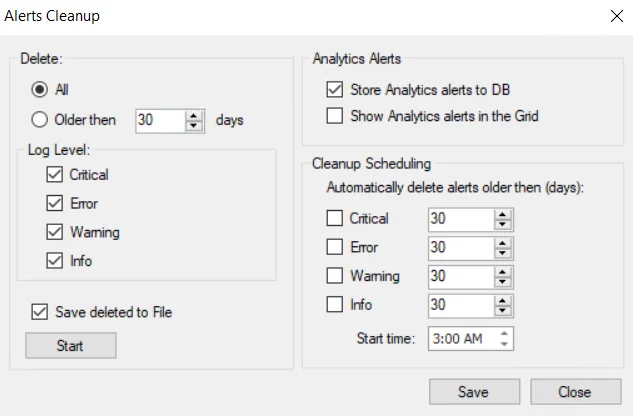
Alerts Cleanup Window
You can clear alert data displayed on the Alerts Interface as well as schedule cleanups for this data.
Export alert data before using the Clear option. See the Alerts Export Window topic for additional information.
Follow the steps to clear the alerts data.
Step 1 – Click Alerts in the left pane to launch the Alerts interface.
Step 2 – On the Alerts interface, click the Clear icon in the top right corner.

Step 3 – The Alerts Cleanup window has these options:
- Delete – Removes alert data from the database. Select All to delete all alert data or select Older than and specify a certain number of days to delete alerts older than the specified number of days.
- Log Level – Deletes alerts that have the log levels that are checked. The log levels are equivalent to the alert severity levels in the data grid on the Alerts Interface.
- Save deleted to File – Saves alert data to a CSV file before it is deleted from the database. On clicking Start, the Save As window appears. Specify a file name and location; the default name is “AlertsBackup[date]_[timestamp]”. Then click Save.
- Analytics Alerts – Choose to display Threat Prevention analytics alerts in the database and/or show them in the Alerts interface. If you choose to display them on the Alerts interface, then this data will also be deleted in the cleanup function.
- Cleanup Scheduling – Deletes alerts after a specific number of days if the severity level is selected from the list. Set the start time for when the cleanup begins.
Step 4 – Click Start to run the alerts cleanup with the applied settings.
Step 5 – Click Save to save any changes or Close to discard the changes and close the window.
Threat Prevention clears alert data from the database according to these configurations. It generates a new alert to notify that the alert data is cleared, identifies the user who cleared the alerts, displays a date time stamp, and what options were configured for the cleanup operation.