QuickStart Script
The QuickStart script generates Netwrix Privilege Secure for Discovery (NPS-D) data for deploying protect mode — both pushing information into NPS-D and pulling data from it. The script authenticates via an API key and can run on a local Windows server or on one of the Ubuntu nodes where NPS-D is deployed.
The script zip archive includes a usage guide with additional instructions.
For advanced usage — bulk reporting, making changes to systems, and managing EDR and OAM policies — see QuickStart Advanced Fields.
Prerequisites
- Python 3.10 or later. Python 3.10 through 3.13 are supported. Python 3.9 and earlier are no longer supported. Download from python.org.
- pip (included with Python)
Step 1 — Download the QuickStart Script
Download the QuickStart tools archive from the Netwrix releases server. Replace <version> and
<major.minor> with the target release:
https://releases.netwrix.com/products/privilegesecure-discovery/<major.minor>/privilegesecure-discovery-quickstart-tools-<version>.zip
Example for 26.06.0:
https://releases.netwrix.com/products/privilegesecure-discovery/26.06/privilegesecure-discovery-quickstart-tools-26.06.0.zip
Extract the contents of the zip file. The archive contains the script files, requirements.txt,
and a usage guide.
Step 2 — Install Python
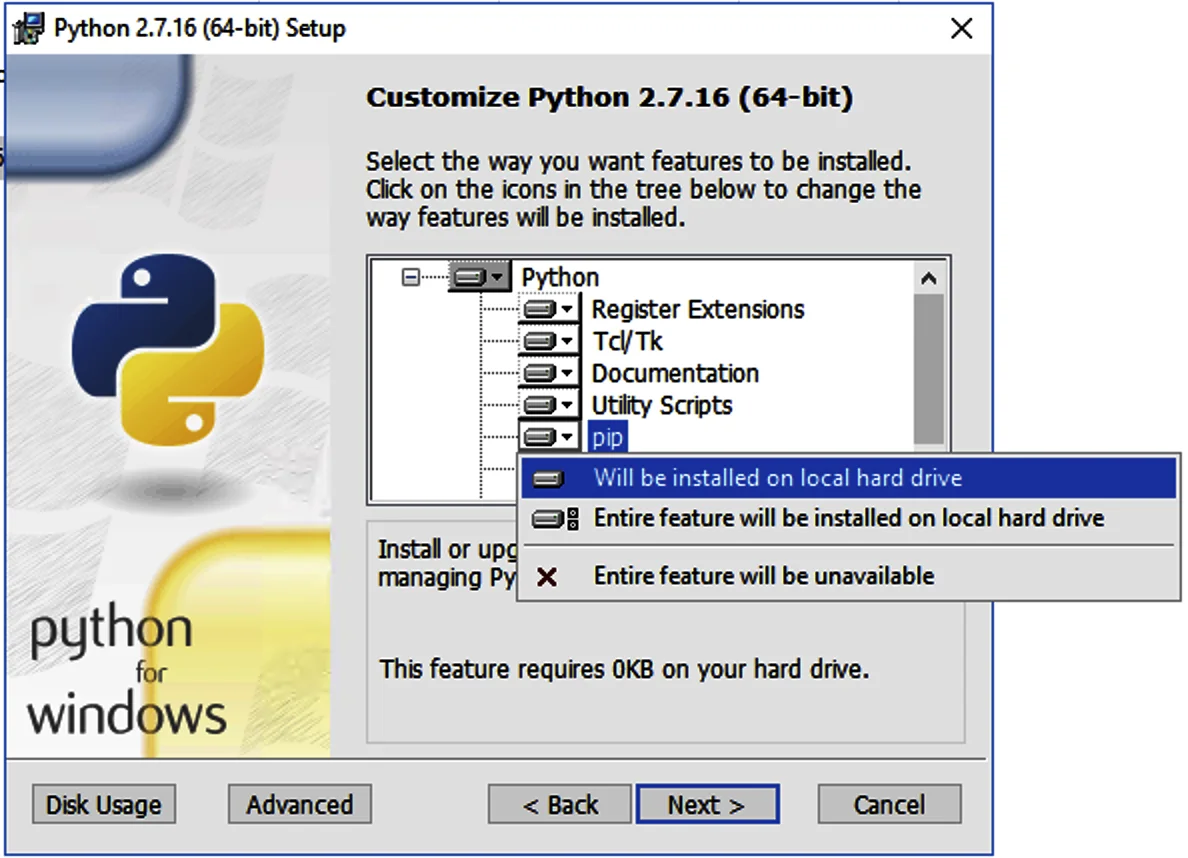
During the Python installation, on the Customize Python window, verify that pip shows Will be installed on local hard drive.
Check Add Python to environment variables and Include Python on filepath.
Step 3 — Install Dependencies
Change to the directory where you extracted the QuickStart script and run:
pip install --trusted-host pypi.org --trusted-host files.pythonhosted.org -r requirements.txt
If the command returns a NewConnectionError with an [Errno 100XX], a firewall or proxy is
blocking python.exe from accessing the internet.
QuickStart versions 2.17 and earlier required a separate openpyxl force-reinstall step. This
is no longer needed — the pinned dependencies in requirements.txt resolve a compatible version
automatically.
Step 4 — Generate an API Key
Generate an API key in the NPS-D UI. The first time you run the QuickStart script, it prompts you to enter the API key.
Store the API key securely. You can't view the key again after closing the dialog box. If you didn't save it, revoke the key in the UI and create a new one.
Step 5 — Configure the Script
Edit reports.py and update the config block with your environment values:
config = {
    'baseUrl': 'https://localhost/api/v1',
    'userId': '59057412c4e92dccc356552c',
    'provisionUser': 'jita.universal'
}
| Field | Description |
|---|---|
baseUrl | URL of the NPS-D API |
userId | NPS-D admin user ID tied to the API key |
provisionUser | Optional. Account name to filter on in generated reports |
Optional: Use a config.json File
As of QuickStart version 2.12, you can move the config block to a separate config.json file
in the same directory as the script. This file persists across QuickStart upgrades.
{
    "baseUrl": "https://localhost/api/v1",
    "userId": "59057412c4e92dccc356552c",
    "provisionUser": "jita.universal"
}
The config.json file requires double quotes around all keys and string values.
Next Steps
See QuickStart Advanced Fields for reporting, bulk operations, and managing system policies.