Data Tracking - Change Logs
Overview
Change Logs let you view details about modifications made to records on tracked objects.
Data Tracking – Change Logs can be accessed from the Change Logs tab by selecting the Data Tracking Changes list view.
- Click the Change Logs tab.
- Change the pinned list view from Recently Viewed to Data Tracking Changes.
- Click a Change Log Name to open the record.
![]()
The platform supports different change tracking behaviors that determine how changes are recorded and enforced when modifications are made to tracked records.
Tracked, Non-Blocking
When an object is configured as Tracked, Non-Blocking, the system monitors changes and records them in Change Logs.
- If the change is associated with an approved Change Request, the system records it as a Compliant Change Log.
- If the change occurs without an approved Change Request, the system records it as a Non-Compliant Change Log.
In this mode, users can complete their changes while the system tracks and evaluates all activity for compliance.
Tracked, Blocking
When an object is configured as Tracked, Blocking, the system enforces stricter change control.
- If a change is associated with an approved Change Request, the system records it as a Compliant Change Log.
- If a user attempts to make a change without an approved Change Request, the system blocks the operation.
In this case, the system displays an error message and doesn't save the change. This mode ensures that all modifications follow the required approval process before being applied.
Alternatively, you can access Change Logs from the following navigation path:
Netwrix Dashboard → Reports → Change Enablement → Data Tracking Change Logs
Reviewing Data-Record Change Logs
The Netwrix Platform Governance Change Log has some features specific to data-record changes:
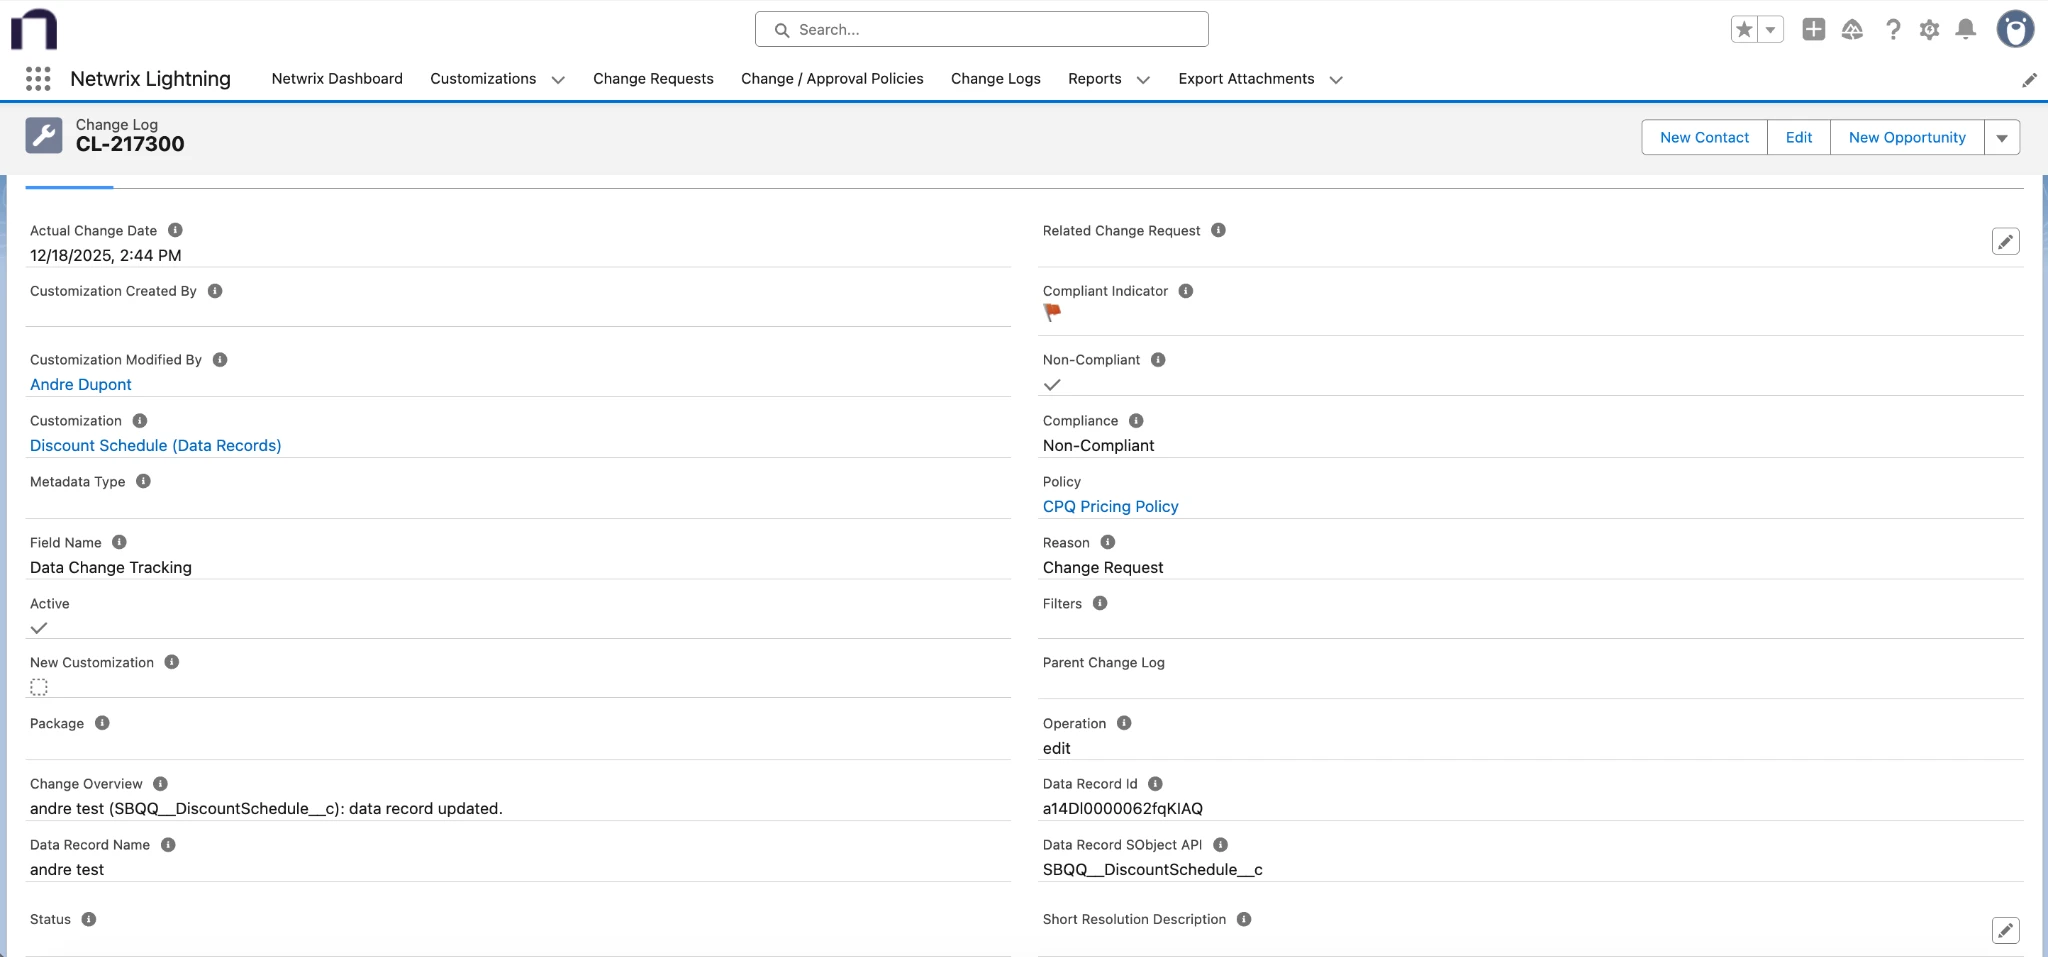
- Customization: Data record Customization for the tracked object.
- Metadata Type: Always blank, because it’s not metadata.
- Field Name: Always “Data Change Tracking”. Use this field to create filtered Change Log Reports and List Views.
- Change Overview: Data record name, API Name of the tracked object, and operation that was done.
- Data Record Id: Data record’s Salesforce Id. Use this to URL-hack directly to the updated record.
- Data Record Name: Data record name.
- Data Record SObject API: The tracked object’s API name.
- Filters: List of filters whose criteria matched this record. (Only populated when an object has filters applied.)
Filtering Change Logs
In some cases, you might want to create Change Logs only when specific conditions are met.
For example:
- You might want to create an Opportunity Change Log only when an admin updates specific fields on a Closed Won Opportunity.
- You might want to exclude Change Logs for User-Defined CPQ Discount Schedules.
With Netwrix Platform Governance, you can apply filters to tracked objects using either a Report or a custom Apex Class.
Using a Report as a Filter
Using a Report is a common way to implement a filter.
Create a report that returns a list of record Ids. If a tracked record update matches the report’s filter criteria, the system creates a Change Log for that record.
Report Requirements
The report must meet the following requirements:
- The Show Me filter must return all records being filtered.
- The standard date filter must be set to the Created Date of the record type being filtered.
- The first column in the report must be the Id of the record.
Example: Don't create Change Logs for changes in “User-Defined” CPQ Discount Schedules This report returns only the Discount Schedule Ids of records that don't have the “User Defined” checkbox checked.
![]()
Using an Apex Class as a Filter
To implement complex filtering logic that a report can't handle, create a custom Apex Class.
Netwrix Platform Governance provides support for custom logic by allowing Apex classes to act as filters.
Apex Class Requirements
The Apex class must:
- Be declared as global.
- Implement the
FLODocs.IChangeLogFilterinterface.
To implement this interface, the class must include the following method:
global Set<Id> getFilteredIds(Datetime start, Datetime end)
The start and end times should be used by your filtering logic to return a Set of record Ids that have been modified during that time interval.
Example: Don't create Change Logs for changes in “User-Defined” CPQ Discount Schedules.
Here’s an example that does the same job as the Report filter described in the previous section.
global without sharing class DiscountScheduleFilter implements FLODocs.IChangeLogFilter {
    global Set<Id> getFilteredIds(Datetime lastModifiedStart, Datetime lastModifiedEnd) {
        Map<Id,SBQQ__DiscountSchedule__c> schedules
            = new Map<Id,SBQQ__DiscountSchedule__c>([SELECT Id
                                                   FROM SBQQ__DiscountSchedule__c
                                                   WHERE SBQQ__UserDefined__c = false
                                                   AND LastModifiedDate > :lastModifiedStart
                                                   AND LastModifiedDate < :lastModifiedEnd]);
        return schedules.keySet();
    }
}
Applying a Filter to a Tracked Object
After the Netwrix Platform Governance scanner runs, it automatically creates a Customization record for the corresponding Report or Apex Class.
To configure the filter:
- Navigate to the Customization record associated with the filter.
- In the Change Enablement tab, locate the Filtered Data Records field.
- Update this field by selecting the Data Record Customization that corresponds to the tracked object.
Example: Apply the DiscountScheduleFilter Apex class to the CPQ Discount Schedule object by linking the appropriate Data Record Customization in the Filtered Data Records field.
![]()