Integrate with Power Automate
You can link an identity store in Directory Manager to Power Automate to achieve the following:
- Trigger a flow from Directory Manager - To achieve this, you have to link a workflow in an identity store to a Power Automate flow. When the Directory Manager workflow triggers, the linked flow triggers automatically.
Trigger a Flow from Directory Manager
You can link a workflow in an identity store to a flow. You can link both system and user-defined workflows to flows.
- As a one-time process, connect your identity store to Microsoft Power Automate. See the Connect an Identity Store to Power Automate topic.
- Link a workflow to a flow by providing the URL of that flow in the workflow. See the Link an Identity Store Workflow to a Flow topic.
Consequently, when the identity store workflow triggers, the linked flow triggers automatically.
When you approve the flow in Power Automate, Directory Manager automatically approves the identity store workflow request. However, if you approve the identity store workflow request first, Power Automate doesn't automatically approve the flow.
Before you begin
- Check the SSL certificate for the Power Automate Reverse Proxy and ensure it is valid and issued by a publicly trusted CA, as Power Automate runs in Microsoft's cloud and validates the proxy's TLS certificate against the Microsoft Trusted Root Program. Power Automate silently rejects certificates from internal or private CAs.
- Ensure that Power Automate Reverse Proxy is deployed on the same machine as Directory Manager. If not, install Reverse Proxy before proceeding.
Connect an Identity Store to Power Automate
To connect an identity store to Power Automate, you must configure a Power Automate client for that identity store. This will establish a communication channel between the Directory Manager Data service and the Power Automate platform.
To configure a Power Automate client for an identity store:
-
In Admin Center, click Identity Stores in the left pane.
-
On the Identity Stores page, click the ellipsis button for an identity store and select Edit.
-
Click Workflows under Settings in the left pane.
-
On the Workflows page, click the Advanced Workflow Settings tab.
-
In the Power Automate Settings section, click Register Client.
-
Enter the following information:
- Organization Code - the unique name for the environment that stores your flows in Power Automate (the segment before the first period; for example, myorg in myorg.crm.dynamics.com).
- Region - the location of your environment (the segment before the second period; for example, crm in myorg.crm.dynamics.com).
- Tenant ID - the tenant ID assigned to the Directory Manager application when you registered it in Microsoft Entra Admin Center.
- Client ID - the application ID assigned to the Directory Manager application when you registered it in Microsoft Entra Admin Center.
- Client Secret - the client secret value to the Directory Manager application when you registered it in Microsoft Entra Admin Center.
-
Click Save on the Advanced Workflow Settings page.
Link an Identity Store Workflow to a Flow
To link an identity store workflow to a Power Automate flow, generate a flow template from an identity store workflow and provide the URL of the flow in workflow settings. When the workflow triggers, the linked flow triggers automatically.
To link a workflow to a flow:
-
In Admin Center, click Identity Stores in the left pane.
-
On the Identity Stores page, click the ellipsis button for an identity store and select Edit.
-
Click Workflows under Settings in the left pane.
-
On the Configure Workflows tab of the Workflows page, click the ellipsis button for a workflow and select Edit.
-
On the Edit Workflow page, click Power Automate Settings in the top right corner.
-
Click Create Template. Directory Manager creates a basic flow in Power Automate with the same name as the workflow, and displays the following message:

-
Next, copy the flow URL from Power Automate and provide it here. To copy the URL, do the following:
- Launch Power Automate, choose your environment, and navigate to My Flows. This page displays the flow you created in Power Automate from the Directory Manager workflow.
- Hover the mouse over the flow to display the ellipsis button. Click it and select Edit.
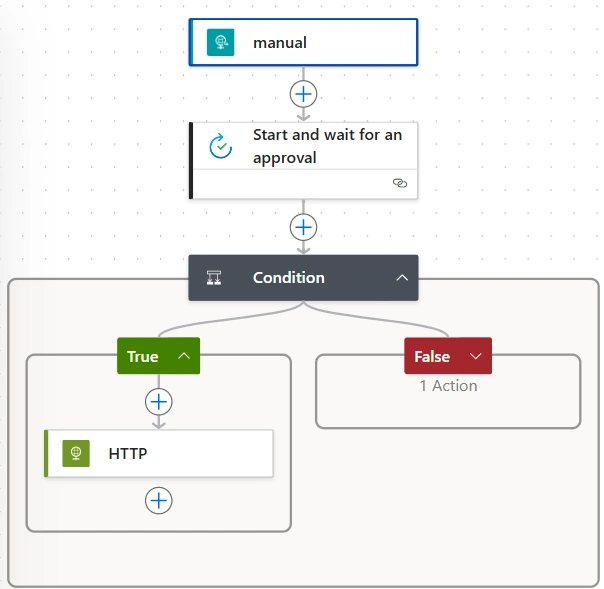
- Expand the Manual area and set Who can trigger the flow.
- Expand the Start and wait for an approval area and set up a new connection field, signing in with your Microsoft account when prompted. Click Save.
- Navigate back to the Edit window. Expand the Manual area and copy the URL displayed for HTTP URL.
-
In Directory Manager, return to the workflow you are linking to the flow, and click Configure a Request URL on the Power Automate Settings dialog box.
-
Enter the copied HTTP URL in the Request URL box.
-
Close the Power Automate Settings dialog box.
-
Click Update Workflow on the Edit Workflow page to save the settings.
-
Click Save on the Workflows page.
-
Next, enable the linked flow in Power Automate. To do so:
- In Power Automate, choose your environment and navigate to My Flows. This page displays the flow you created in Power Automate from the Directory Manager workflow.
- Hover the mouse over the flow to display the ellipsis button. Click it and select Turn on.